Tuesday, 30 October 2012

Custard Sponge Cake


Sponge Cake,,,,,the very words are enough to make me run for the hills.  I remember my Mum always said that the perfect sponge cake was hard to achieve and I should just stick to normal cakes if I wanted a success.  I don't know why, but these words that she said to me way back when I first started to bake things, way back when I was an early teen, stayed with me and I just never bothered with a sponge cake.  I would try my hand at any other cake, but nope not a sponge.

So when I came across this recipe last month, I decided it was time to bite the bullet and give it a go (after all it is just a cake for goodness sake! lol).  So I decided that for Hubby's birthday, he would get a sponge cake.  With my Mum's words still echoing in my head, I told him to grab a pavlova from the Cheesecake Shop on his way home from work,,,just in case my sponge was inedible!

I needn't have worried.  This cake was definitely edible and in fact quite yummy.  It probably could have been a little bit lighter and fluffier but I had Stinky helping me make her Dad's cake this year and the mixture did get a little overwhipped, but considering this, the cake was quite light and fluffy.  I am going to try making it again,,,,,this time without my helper lol,,,,,and see just how light and fluffy I can get it.

Here is the link for the recipe:  Custard Sponge Cake

Go on and give it a go, you won't be sorry!!

The decorated result


Straight out of the oven,,,,to say I was ecstatic was an understatement lol

Wednesday, 2 May 2012

Armenian Nutmeg Cake


A few weeks ago (shows how behind I am in blogging recipes doesn't it lol), I was after something a little different.  Hubby and I are dieting so we shouldn't be eating cake but I just wanted a taste of something sweet (you know, just a slither of sweetness!) and I needed something for the kid's lunchboxes for school.

I saw this recipe in my folder and thought it sounded a little different so I would give it a go and it was really quite nice.  It doesn't have a really strong flavour so the kids liked it too.  It is just that little bit different to your standard cakes.  I love the little two tone effect it has!

ARMENIAN NUTMEG CAKE

1 cup Self Raising Flour
70 grams Butter, roughly chopped
1 cup Plain Flour
1 teaspoon Bicarb Soda
1 teaspoon Nutmeg
1 cup Milk
2 cups Brown Sugar, firmly packed
1 egg, lightly beaten


Preheat oven to 180 degrees.
Lightly grease shallow tin 15cm x 20cms (or round tin lol)
Sift flours and nutmeg into large mixing bowl
Stir through the sugar
Rub in the butter until mixture looks like fine breadcrumbs
Spread one third of crumb mixture over the base of the cake tin and press down lightly
Dissolve the bicarb soda in the milk and add to remaining crumb mixture
Add beaten egg and mix well
Pour into the tin
Bake in the oven for 35-40 minutes or until a skewer comes out clean and top is brown
Allow to stand in tin for 10 minutes before turning out


Monday, 23 April 2012

HOT CROSS COOKIES - An Easter Treat!

I know this recipe is a little late in the scheme of things, but what can I say lol.  It was a brand new recipe to me right before Easter and I made them on the Easter weekend.  Naturally it has been school holidays since then and I am a little behind in my blogging.


This recipe is really quite yummy and was pretty simple to prepare as well.  I liked how there was nothing fancy in them.....perfect for those long weekend cooking sessions when the shops aren't open!

I have quite a few kids that don't like sultanas so these weren't an all round hit in my house but for those of us that do like sultanas,,,they were delicious.

HOT CROSS COOKIES 
(Recipe borrowed from the Sunday Mail Newspaper in Adelaide - Food with Donna Hay section)

125 grams butter, softened
1 cup (175 grams) brown sugar
2 eggs
1 teaspoon vanilla extract
2 teaspoons finely grated lemon rind
2 1/2 cups (375 grams) self raising flour, sifted
2 teaspoons cinnamon
1 teaspoon mixed spice
1/3 cup (80ml) milk
1/2 cup (80 grams) sultanas

Icing
1 cup (160 grams) icing sugar, sifted
1 tablespoon boiling water


Preheat oven to 180 degrees.
Place the butter and sugar in an electric mixer and beat for 8-10 minutes or until pale and creamy.
Gradually add the eggs and vanilla, beating well after each addition.
Add lemon rind, flour, cinnamon, mixed spice, milk and sultanas, and beat until a smooth dough forms.
Roll tablespoonfuls of the dough into balls and place on lightly greased baking tays lined with non stick baking paper.  
Bake for 15 minutes or until lightly golden.
Allow to cool on trays.


To make the icing:
Place the icing sugar and water in a bowl and mix until a paste forms.
Place the mixture in a piping bag (I used a snap lock bag with the corner snipped off) fitted with a 3mm nozzle and draw a cross on each cookie.
Allow to dry on wire rack.

Enjoy at any time of the year!!!!


Friday, 20 April 2012

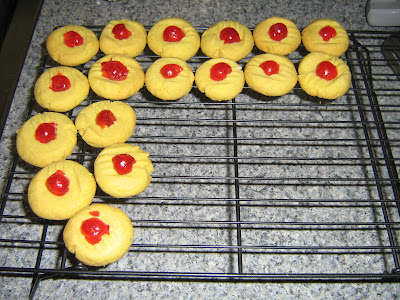
Custard Cherry Cookies


Wow, it has been so long since I have had a chance to share any recipes, I just can' believe how fast this year is going.  I must admit I have been sticking to my failsafe recipes lately and forgetting to photograph the dishes lol,,,,,not something I should forget to do considering the main aim of this blog is to create a recipe file of the kid's favourite recipes right???  Right!

But life is life and it moves so fast that I tend to cook, the kid's make the said dishes disappear at the speed of light and then I think "Darn I really should have grabbed a photo of that".  Aaah well such is life.  I will try to keep a camera at the ready more often,,,,,notice I said "try"!!!

Sweet dishes are something that I usually do get the chance to take photos of and I love to try out new sweet things.  Sweets are one thing that I usually find at least a couple of the kids will like regardless of what I make. I like making cakes and biscuits due to the simple fact that they at least last a couple of days at least.

This is a recipe I found a few years ago in a magazine (don't ask me which one, I have no idea lol).  Straight away I was reminded of my Mum making these when I was a kid.  I loved them back then and my kids loved them too.  I found them a little too "dry" for my taste now, but one mouthful was all it took to take me back to munching on these out on the big back verandah when I was about 8 or 9 years old.   I remember I used to eat the biscuit all the way around and save the bit with the cherry for the last bite!


My kids gave these the thumbs up, with most of them even eating the cherry which surprised me considering they all generally screw their noses up at glace cherries!


CUSTARD CHERRY BISCUITS

250 grams unsalted butter, chopped, at room temperature
1/2 Cup icing sugar, sifted
2 Cups plain flour, sifted
1/2 cup custard powder, sifted
Glace cherries, halved - 1/2 a cherry per biscuit


Preheat oven to a moderate 180 degrees (I used 160 degrees in my fan forced oven)
Lightly grease and line 2 baking trays
In a large bowl, using electric mixer, beat butter and sugar together until pale and creamy.
Gradually fold in the flour and custard powder combined.
Roll level tablespoons of mixture into balls.
Arrange on prepared trays, leaving space between each biscuit to allow for spreading.
Flatten lightly with a fork.
Press cherry halves, cut side down onto each biscuit.
Bake for 12-15 minutes until lightly golden.
Cool on trays.

*  These biscuits will be soft when removed from oven but will harden on cooling  *

Thursday, 22 March 2012

Fried Rice

Just to prove that we aren't all about sweets in this house, we tried out a new Fried Rice recipe a few days ago that I definitely think is worth sharing.  I don't usually attempt fried rice as I have never been able to get it to taste as good as the Chinese restaurants do and I don't normally enjoy it.  This one however, we all loved and the best bit is that it tastes equally good cold!


We used a recipe out of "Wok & Stirfry", a book given to us by Buddha's best friend's mum and dad for Christmas.  His friend's mum is Asian and Buddha loves going to their house and always comes home telling us of yummy food that he has eaten there.  I have asked her for several of her recipes,,,,maybe this gift was a hint to stop asking her for recipes?? lol


Anyway, finally we got around to trying one of the recipes and oh boy I am so glad we did.  The book calls this Chicken Fried Rice, but since I was cooking chicken anyway, I left the chicken out and added in diced bacon instead.


CHICKEN FRIED RICE

Small knob of butter
2 large eggs, beaten
1/2 tablespoon oil
6 spring onions, chopped
450 grams cooked chicken, cubed (I used bacon pieces)
3 tablespoons Soy Sauce
2 carrots, diced
1 celery stick, diced
1 red pepper, deseeded and diced
175 grams peas
100 grams canned sweetcorn, drained
275 grams cooked, long grain rice

Heat the butter in a small heavy based frying pan and add the beaten egg.
Swirl the egg until it covers the base of the pan.
Cook until the egg has set and is cooked through, then turn out onto a plate.
Cut the omelette into strips.

Heat a wok over medium heat then add the oil.
Add the spring onions and fry till soft, then add the chicken/bacon and 2 tablespoons of soy sauce and stir fry for 5-6 minutes.

Stir in the carrots, celery, red pepper, peas and sweetcorn and stir fry for 5 minutes.
Add the rice and stir thoroughly.

Finally add in the omelette strips and remaining soy sauce.

Serve immediately

This was more or less a tripled recipe - I was serving 6 plus I made enough for left overs so the kids could  have it for a quick dinner the following night, plus Buddha had it for school lunch for 2 days as well.

Monday, 19 March 2012

Chewy Chocolate Brownie,,,,,a winner with the Kids!


 Can you believe I have never, not ever in my life, baked Chocolate Brownies?????  I can't.  I remember when I was a kid, growing up reading books based in America and reading about Chocolate Brownies and thinking they must truly be the most divine things ever put on the planet.  I have been a mum for over 17 years now but still, I never baked Chocolate Brownies.  I have never wanted to make the packet variety, they never seemed like the real deal.

Finally in my stash of recipes I came across a "Chewy Chocolate Brownie" recipe.  This recipe I have probably had for a good 10 or more years, but I have never made it, don't ask me why.  Finally last week, I decided to give it a go.  I needed something quick to whip up that would be good with icecream for dessert that night, but also be good enough to keep a couple of days and be used for school lunchboxes.  This did both those things very well.  I didn't get to taste it myself as Hubby and I are on a diet and I was being very well behaved lol, but the kids all loved it and want me to bake another batch this coming weekend, so it must have been pretty good.

CHEWY CHOCOLATE BROWNIE

125 grams Butter, melted
2 cups Brown Sugar
1/2 cup Cocoa
1/2 teaspoon Vanilla Essence
2 Eggs
1 cup SR Flour
1/2 cup Pecan Nuts, finely chopped (I used Almonds)

Mix the melted butter and sugar, sift in dry ingredients and mix thoroughly.
Add the remaining ingredients, combine well.
Put into  a greased and floured (or baking paper lined) pan and cook for 30 minutes at 180 degrees.
Cut up into small squares and serve with cream/icecream or they are equally great as a lunch box treat on their own.


Friday, 16 March 2012

ANZAC BISCUITS


It has been so long since I last posted a recipe, I just don't know where the year is going!!!  I have a little catching up to do.  I haven't been doing a lot of cooking, well cooking yes, but trying out new recipes or making cooking anything really inspiring or noteworthy, no.  I have decided to go away from the "step by step" photography for my blog.  I will on occasion do it, but generally this will just be the photos of the end result and the recipe, along with a little of my rambling on of course lol.  I made this decision primarily because I am just too lazy and also because my camera isn't that great and I found myself taking ages to get a decent photo, particularly when trying to photograph flour/sugar, batters etc, so it has been put in the too hard basket and I will leave that for the professional bloggers/photographers of this world lol.

Anyway, back to my Anzac Biscuits.  Anything Anzac is Buddha's favourite sweet treat.  He loves Anzac biscuits, slices and cakes.  Usually I whip up a batch of Anzac Slice because it is so quick and easy.  I don't make biscuits that often because they take so much more time, especially in my oven where I can only really use one shelf for baking as the lower shelves will result in burnt offerings!

But this time I had a "new to me" recipe for these biscuits and, well a new recipe just has to be tried out using the recipe for the purpose it was designed for I think.  I couldn't make this into a slice, it had to start out as biscuits!

They were yummy too.  This batch didn't last long in my house,,,,,even the batch that were a little over cooked got eaten, that always means they must have been good!!


ANZAC BISCUITS

2 cups Plain Flour
1 cup Sugar
2 cups Rolled Oats
1 1/2 cups Coconut
3 tablespoons Golden Syrup
250 grams Butter
3 teaspoons Bicarb Soda
4 tablespoons boiling water

Preheat oven to 160 degrees.
Mix flour, sugar, oats and coconut together in a large bowl.
Melt the butter with the golden syrup - you can use a microwave or stove.
Heat until the butter is melted and the mixture bubbles.
Dissolve the bicarb soda in boiling water.
Add to the butter mixture.
Add the butter mixture to the dry ingredients.
Mix and roll into small balls.
Place on greased trays, allowing room to spread.
Bake for approx 20 minutes or until golden brown.


Wednesday, 15 February 2012

Chocolate Cereal Crumb Slice

I have been so slack in the cooking department lately.  My brain hasn't been able to get past the quick and easy food that I have been making for years.  No new recipes have been cooked, which is pretty sad really.  Now that school is back, I hope to regain my cooking mojo and start working through my cookbooks again.

This recipe was selected for its super fast making time and the fact that I had everything on hand last Saturday morning lol.  I desperately needed something for this week's lunchboxes and wanted to try something new at the same time.  This recipe filled those requirements.

The kids loved this, well all except Buddha cuz he don't like chocolate lol.  You can add dried fruit to it as well if you like but since I didn't have any on hand, I left it out.


CHOCOLATE CEREAL CRUMB SLICE

2 cups of dried cereal crumbs (I used the crumbs from the Vita Brits)
1 cup of Flour (any flour will do)
1/2 cup Coconut
2/3 cup Sugar (brown or white)
1 cup of Chocolate Chips (I used some Nestle Chocolate Melts)
1/2 cup of any Dried Fruit (I left this out)
120 grams melted butter or margarine
1-2 tablespoons Milk

Melt the butter in microwave or on stove top.
Add all other ingredients and enough milk to get a slightly moist consistency.
Mix well.
Press into a lined lamington tin and bake in moderate oven for about 30 minutes.
You can ice it if you like but it really doesn't need it.


Trust me, its good!!!

Monday, 30 January 2012

Sausage Casserole

This is a new to me recipe and one that I have no idea where it came from.  Somewhere in cyberland is my guess.  I have to say though that it smelt really yummy as it was cooking and it tasted pretty darn good too.  All the kids enjoyed it, even the Jayman who doesn't usually like any type of sausage bake type of meal.

While this recipe certainly doesn't rate high on the "healthy" eating register, it is certainly a wonderful winter warming recipe.  The smell that filters through the house is just delicious and reminds me of cold winter days lazing around the house drinking hot chocolates and reading books lol.  The fact that I have chosen the middle of summer to try this recipe out is a whole different story but thats beside the point lol.

This is a cross between a Shepherds Pie and a Devilled Sausage type of meal I would say.  I made a big batch as I wanted left overs for lunches the next day (the joy of school holidays lol) but you can cut it down accordingly.  I will definitely be making this again but I think next time I will only use one packet of the french onion soup mix and as thought it made it just a little salty, but I will taste test the sauce mix before I mix it together and can easily add another packet if need be :-)

This recipe is based on the size of serve that I made.  This size was baked in my large baking tray and fed 5 for dinner with seconds and then there were 6 serves left over for lunch the following day.


SAUSAGE CASSEROLE

Potatoes (use your own judgement, you need enough to make mashed potato to cover your chosen baking dish)
Milk to mash the potatoes
Butter to mash the potatoes
2 Tablespoons Olive Oil
2 Brown Onions, sliced
1.5 kgs Sausages 
Frozen mixed veggies of your liking (use as much or as little as you like)
1/2 cup Tomato Sauce
1/2 cup BBQ Sauce
2 Tablespoons Worcestershire Sauce
2 x 35gram packets of French Onion Soup Mix
2 Tablespoons Plain Flour
Grated Cheese to top

Dice potatoes and place in saucepan with cold water.
Bring to boil over high heat.  Reduce heat to medium-low and simmer for 20-25 minutes or until tender.
Drain.
Add butter and milk and any seasoning you may like.
Mash until smooth.

Preheat oven to 200 degrees celcius
Heat oil in deep frying pay over medium heat.
Add onion and cook for 3 minutes or until browned.
Chop the sausages into bite sized pieces.
Add to frying pan and cook, stirring occasionally.
Add in the mixed veggies, continuing to stir occasionally.
Whisk tomato sauce, bbq sauce, Worcestershire sauce, soup mix, flour and 1 1/2 cups of water together in a jug.
Stir the sauce mix into the sausages and bring to the boil.
Spoon the mixture into a large casserole dish or baking tray.
Top with the mashed potato.
Sprinkle with grated cheese.
Bake for approximately 30 minutes in oven.
Enjoy with salad and a bread roll 
 (No meal like this can possibly be served with out a little bread roll according to my boys lol)


Thursday, 19 January 2012

Boiled Fruit Cake - My Mum's recipe

This recipe is very dear to me.  My Mum made this countless times and it is one of the only recipes I got her to actually write down for me.  I am so glad I did!

I'm not a huge fruit cake lover but I have always eaten my Mum's fruit cakes.  I used to call them the Fruit cake for people who don't like Fruit Cake lol.  Even my Hubby likes this cake and he doesn't usually eat Fruit Cake at all.  Stinky and Buddha don't usually like anything with sultanas in it but both quite like this cake.

This is the cake that I got my mum to make for my first wedding.  She was determined that wedding cake should be a fruit cake,,,,,back then I hated all fruit cakes except hers and used to hate wedding cakes.  I didn't even want fruit cake for the wedding but she insisted so I compromised and said that if she made the cake then I would have fruit cake.  Lol I won that battle!

I hope this recipe continues to get passed down from generation to generation in my family.


BOILED FRUIT CAKE

225 grams Butter or Margarine
1 cup Sugar
1 packet Mixed Fruit
1 packet Glace Cherries
2 teaspoons Mixed Spice
1 teaspoon Carb Soda
1 cup Water

2 Eggs
2 tablespoons Treacle
1 cup Plain Flour
1 cup Self Raising Flour


Place all ingredients from Butter/Margarine through to Water into a saucepan and bring to the boil.
Allow to cool

Fold beaten eggs into the above mix.
Add Flours and Treacle and mix well so it is thoroughly combined (just use a wooden spoon to do this, no mixer required)

Pour mixture into a well greased/lined tin and cook at 160 degrees Celsius for approximately 1 1/2 hours.


This cake keeps well and is lovely and moist with a lovely light flavour.

Monday, 16 January 2012

Christmas Wreath - or anytime you feel like something really quick to whip up lol

This is one of my children's favourites.  It is something they all eat and agree on (which is a rarity believe me!).  I always make on at Christmas time hence the name, but I have been known to whip one up at any time of the year and just change the decorations a little.

Here is the one I made this Christmas,,,,sorry for the lack of photos of it cut into serving size lol.


So easy and simple to whip up.


CHRISTMAS WREATH

2 packets of Butter Snap biscuits (these are my kid's favourite but I sometimes use Ginger Snaps as they are nice and hard and give it a whole new flavour, yummy)
600ml thickened cream
Vanilla Essence
Castor Sugar
Lollies to decorate

Simply whip the cream until nice and thick.
Whip in a dash of Vanilla and a sprinkling of castor sugar (taste test and add as much sugar/vanilla until the taste is right for you.
Then it is simply a matter of assembling the wreath.
Simply put a dab of cream on a biscuit and then continue to do this, building your biscuits into a wreath shape.
Cover the whole thing in cream and then decorate to your liking with lollies.

Allow to rest in the fridge for a few hours to allow the biscuits to soften and absorb the cream a little .
Slice and serve with a scoop of icecream or just simply on its own.